Best Rock Tumbler Polish: Alumina, Cerium & Tin Oxide
The expensive polish is not automatically the best polish. First confirm the rock finished every grinding/pre-polish stage without retained scratches, pits or contamination; then choose a compatible final compound.
Choose equipment from the material and job first—not from the retailer first.
What polish should you use in a rock tumbler?
Choose polish only after the stones are genuinely ready for the final stage. Aluminum oxide is a common general starting point for many hard-silica rocks; cerium and tin oxide can be deliberate alternatives for suitable materials and processes. No polish fixes retained coarse scratches.
Polish cannot repair an unfinished grind.
If stones are dull because scratches remain, return to the abrasive stage that can remove them. If the surface is genuinely pre-polished, aluminum oxide is a strong general starting point for many hard-silica loads; cerium or tin oxide can be deliberate alternatives for suitable materials/processes.
Before changing polish, diagnose the finish
Check the source, model and buying conditions.
Manufacturer pages and manuals support the specifications identified in a guide. Check the exact model and current instructions before purchase; similarly named variants can differ.
A product card’s check date applies to that record. The page revision date does not mean every product was rechecked. Confirm current price, seller, package contents and availability on Amazon.
These guides use published information and editorial selection criteria. Hands-on testing is not claimed unless a guide describes the actual test.
Shopping cards show products with a direct Amazon purchase link. This limits the displayed selection; it is not a comprehensive market comparison. Use the tool-class guidance and current manufacturer instructions to assess other options.
- The Rock Shed grit & polish catalog
- Highland Park tumbling guide
These references support product specifications or procedures, not independent proof of performance. Follow the instructions for the exact equipment you use.
Editorial method: read the Gear Review Methodology & Evidence Policy. Affiliate relationships: read the disclosure.
Rock polishing products with verified product images
These are multi-stage abrasive and polish refill kits rather than standalone final-polish jars. Confirm the final polishing ingredient and the exact stages included before ordering.

National Geographic Rock Tumbler Grit & Polish Refill Kit
Best for: Replenishing a standard multi-stage rock-tumbling abrasive and polish workflow
Before buying: Confirm the exact current variant, included accessories and seller on Amazon before purchase
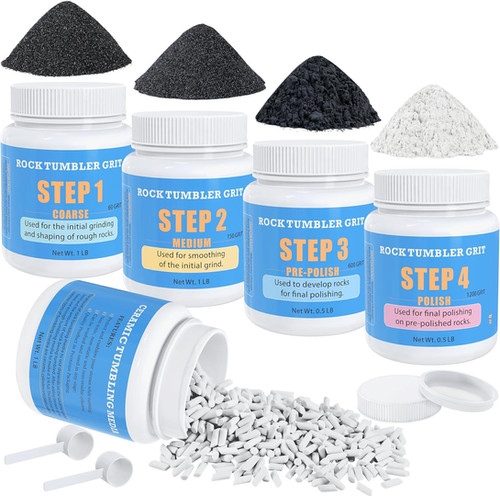
KomeStone 4 lb Four-Step Rock Tumbling Grit and Media Kit
Best for: Four-stage grit refill plus ceramic tumbling filler for repeat rock-polishing runs.
Before buying: Four pounds total includes about one pound of ceramic media; do not treat it as four pounds of abrasive grit.
Affiliate disclosure: As an Amazon Associate, USA Rockhounding earns from qualifying purchases. Product listings, sellers, prices and availability may change; confirm the exact item on Amazon.
How to diagnose dull tumbled rocks before changing polish
The finishing compound is only the final part of a grinding-and-polishing sequence. A cloudy or scratched surface may indicate incomplete pre-polish, mixed-hardness stones, contaminated barrels or an unsuitable rock rather than an ineffective polishing product. Inspect a dried specimen under bright angled light before ordering a new compound.
Three common finish problems
- Visible scratches: Return the affected stones to the appropriate preceding stage. Polish does not remove deep grinding damage.
- Dull, even surface: Check the mineral’s likely polishability, the grade and type of polishing compound, and whether the tumbler is moving the load as intended.
- Random new scratches: Clean the barrel and lid thoroughly, separate abrasive-stage equipment and inspect stones or media for chipped edges.
Compare compounds responsibly
Review the material, particle specification, manufacturer usage instructions and machine compatibility. Do not assume that a compound marketed for glass, metal or automotive finishes will suit a lapidary barrel. Use only supplies recommended for the particular wet or dry process. Never mix chemicals or substitute household abrasives simply to save a finishing stage. Record the stone type, prior stages and loading conditions to make future batches repeatable. For abrasive progression, read rock tumbler grit and compare the action of rotary versus vibratory machines.
Determine whether the rocks are ready for final polish
Polishing is the last operation in a sequence of progressively finer surface preparation. A compound chosen at random cannot reliably erase a pit, coarse scratch, bruised edge, or uneven pre-polish. Rinse stones from the preceding stage, dry them fully, and inspect several specimens under an angled light. Decide whether defects are shallow grinding marks, deeper fractures, or natural features of the rock itself. A porous or composite rock may never resemble solid agate regardless of the cost of the final powder. Buying the right polish starts with understanding this surface, not with comparing advertised shine.
How different abrasives fit together
Coarse silicon carbide commonly starts a rotary tumbling sequence by removing corners. Intermediate abrasives then remove marks left by the previous stage, and a finer pre-polish prepares the surface for final polishing. Packages sometimes label these as steps one through four, but the number on a sachet is not a technical specification. Check actual material, grade, manufacturer guidance, and intended machine. When a supplier changes the recipe, record the change before judging performance. A batch that has not finished one abrasive stage is not rescued merely by moving on to a finer compound.
Aluminum oxide
Aluminum oxide is widely used in fine abrasive and polishing products, but its formulations and grades differ. A product intended for final rock polishing may be different from one sold for pre-polish. Do not assume any similarly named household or industrial powder is an interchangeable substitute. Read the supplier’s instructions, including any restrictions on tumblers, water, media, or stone type. Avoid mixing products with unknown binders. Compare the cost of enough compound for an entire batch, not simply the price per container, because the intended dosage may differ among brands.
Cerium oxide and other specialty polishes
Cerium oxide is familiar in some glass and lapidary finishing applications, yet it is not automatically the best final stage for all rocks. The combination of surface, contact method, equipment, and compound matters. Other specialty powders such as tin oxide can be relevant to particular finishing techniques, but a higher unit price does not demonstrate superior results in a rotary barrel. Before changing chemistry, test a compatible sample you can afford to reprocess. Keep all other controllable parts of the procedure as consistent as possible so you can interpret the outcome.
Choose polishing methods for the actual material
Agate and jasper are often suitable for a conventional rock tumbling process when the rough is sound and the load is sorted sensibly. Material with friable seams, vugs, porous bands, softer veins, or weak cement can respond unevenly. Mixed rocks may contain grains that polish at different rates; this can create a textured surface even after extended finishing. Identify the stone sufficiently to judge whether general tumbling makes sense. Treat fragile crystal clusters, scientifically important samples, and rare natural forms differently from ordinary lapidary rough: sometimes the best finishing decision is to preserve the specimen untouched.
Inspect for fractures before tumbling
Fine cracks can hold coarse abrasive, open further during operation, or cause pieces to break. Look for fractures under angled light, and set aside pieces with fragile, sharp, or unstable projections. Do not mistake a wet reflective film for successful grinding. Dry examination reveals surface defects more honestly. Even among stones of broadly similar hardness, the shape and degree of alteration may make some unsuitable batch partners. Sorting before the first stage can save many hours of rework later, whereas a poor combination may contaminate an otherwise sound polishing run with chips and abrasive residue.
Clean the barrel as carefully as the stones
Unexpected late-stage scratches often come from contamination. Pour slurry through a suitable catch-and-separation setup rather than into household drains, following local disposal requirements. Clean the tumbler barrel, the lid, gasket, threads, and any recesses where coarse grains accumulate. Inspect media, small stones, and pockets where grit can lodge. A bucket or cleaning brush previously used for rough grinding may transfer particles to polish. Clearly labelled tools and stage-specific containers reduce accidental carryover. The time spent on cleaning is part of the polishing process, not wasted downtime.
Separate media by abrasive stage
Ceramic media can aid load contact or spacing, but pieces previously used with coarse grit may retain abrasive or chipped edges. Some collectors reserve a separate batch of media for final polish instead of attempting to verify that every used piece is uncontaminated. Check the original media’s intended use; industrial deburring products are not necessarily equivalent to nonabrasive hobby tumbling fillers. Store each stage in a separate marked container. If a polish attempt suddenly develops defects, inspect the media and cleaning tools before replacing the powder with a more expensive brand.
Set up a rotary tumbler for meaningful polishing contact
Barrel fill, stone sizes, compatible media, slurry, and speed must work together. Underfilling may increase damaging collisions. Overfilling may prevent the tumbling action required for consistent surface contact. An unsuitable mix of large and small stones can lead to chips or poor circulation. Follow the specific machine manufacturer’s approved loading and water instructions rather than copying a recipe from a differently shaped tumbler. If the motor strains, the barrel leaks, or the motion changes, stop and troubleshoot the equipment. These are not symptoms that extra polishing compound reliably cures.
Why vibratory finishing uses a different approach
A vibratory machine moves stones differently from a rotating barrel and frequently preserves more of their original outline. Its abrasive and water requirements may therefore differ. Some vibratory setups assume that the rock has already been rounded or otherwise shaped. The bowl should circulate material according to the maker’s instructions; a stationary or clumped load is a warning to investigate. A small change in moisture can alter the slurry’s behavior. Never assume that a powder quantity, processing time, or stage sequence suitable for a rotary barrel can be copied directly into a vibratory unit.
Evaluate the result only after drying
Wet stones can look glossy even when their surface remains slightly rough. Rinse and dry several representative pieces and inspect broad faces, edges, pits, and transitions between mineral phases. Photograph a few marked specimens after every stage under similar lighting. Ask three separate questions: Is the shape acceptable? Have visible scratches from earlier grinding been removed? Is the final sheen appropriate to the material? These questions point to different corrective actions. A stone that rounded well but has a dull surface requires a different diagnosis from one that has brilliant flat spots but sharp unrounded corners.
Common failure: uniform cloudiness
A cloudy finish may reflect microscopic scratches, incomplete pre-polish, incompatible mineral constituents, or a compound that does not suit the process. Begin with a dry visual inspection rather than declaring the polish defective. Check whether the previous stage was genuinely complete, whether the material polishes uniformly, and whether the machine maintained proper motion. If an identical known material previously polished well, compare the two workflows. Extending final polishing indefinitely can wear the rock without fixing scratches that belong to an earlier stage. Revisit the appropriate prior step instead of adding unmeasured extra powder.
Common failure: random scratches appear late
New isolated scratches after a good pre-polish suggest stray abrasive, a broken hard fragment, or contaminated polishing media. Inspect the equipment, cleaning tools, barrel creases, and stone pockets. If one unstable specimen chipped apart, remove it and examine the rest of the load. Polishing compound alone may not remove the resulting marks. Keep contaminated material separate and return affected pieces to an appropriate earlier stage when necessary. An inspection record that identifies exactly when scratches first appeared is more useful than repeating the same failed final stage.
Common failure: white bruised edges
Small chips and pale fractured marks along corners may come from contact impacts, brittle material, and unsuitable loading. Review fill volume, differences in stone sizes and toughness, and whether the material itself should be tumbled. Media can sometimes change how stones touch, but excessive media can also alter the barrel action. Avoid treating every bruised stone as a chemistry problem. Photograph the damage, sort the material, and test a more compatible batch. Some heavily fractured rocks are better suited to careful hand finishing or display in their original state.
Common failure: grit trapped in holes and pits
Vugs, cracks, and porous bands can harbor residue that escapes a superficial rinse. Later, movement may release particles onto otherwise prepared surfaces. Examine problematic stones before transfer between stages and consider whether they should be processed separately. Do not probe fragile cavities aggressively with sharp tools if that risks breaking crystals. A rock with extensive open holes may not achieve an evenly polished appearance in a standard barrel; the geometry prevents uniform contact. This is a limitation of the object and process, not proof that a different brand of compound will work miracles.
Build a small comparison test rather than guessing
For a useful experiment, select similar sound stones from one material source. Divide them into comparable batches with documented starting condition and size distribution. Change only the finishing compound while keeping the machine, cleaning procedure, pre-polish preparation, load, and media as similar as feasible. Record the exact product instructions used and photograph dried surfaces after finishing. Compare scratch visibility, edge damage, consistency, processing effort, and waste. If results vary strongly within each batch, sample differences may be more important than the product choice. Do not present an uncontrolled test as proof that one brand is superior.
Cost comparison beyond the polish container
A low-cost polish may be economical if it consistently finishes correctly prepared loads; an expensive compound can be wasteful if it is incompatible with the process. Calculate expenditure per completed batch, including abrasive quantity, media, electricity, cleaning effort, and stones requiring rework. The relevant purchase may be a replacement gasket, compatible media, or better pre-polish rather than another bottle of powder. For high-volume use, consider the time needed to keep stages separate and clean. For occasional hobby use, an understandable complete sequence with good instructions may justify paying more than purchasing unlabeled powders in bulk.
Handling, storage, and disposal
Use the supplier’s handling information for each powder and prevent airborne dust during pouring or cleanup. Wet slurry should not be allowed to dry into a cloud of fine particles in a living area. Avoid washing abrasive sediment into plumbing. Maintain safe machine placement, electrical protection where wet methods are used, and age-appropriate supervision. Mineral dust can pose hazards, particularly when the material or composition is unknown. Never taste a specimen or polishing product to identify it. Keep polishing compounds in labeled sealed containers separate from food and household cleaning supplies.
Buying checklist for a complete polishing system
Confirm the machine, stone type, quantity and condition of rough, the preceding abrasive grade, compatible media, final polishing product, dose instructions, and cleaning arrangement. Compare specific product descriptions instead of treating every bag labelled “rock polish” as the same chemistry. Make sure you can reorder a known successful product. If the desired finish is not achieved, diagnose the stone and prior stages first. See the grit stage guide for abrasive progression, the media guide for load management, and the rotary versus vibratory comparison for choosing the right motion.